Last Updated on May 31, 2024 by UX World
To read the initial part of the article, go to Part I.
A UX designer is the person who defines the user experience of a product. To provide a better user experience, as a UX designer, you follow the design process that helps you to better organize different stages of the product design. At each stage of the process, there are certain UX design deliverables that you build and they behave as input to the next stage of the process.
This article describes the best practices of a few UX design deliverables that are produced throughout the design process. There can be many deliverables that UX designers create while designing a product, however, this number varies depending on the process, the type of product, and user requirements.
- User Personas (Part I)
- User Flows (Part I)
- Wireframes
- Prototypes
To study the best practices of User Personas and User Flows, please go to Part I of the article.
If you don’t want to read the content, watch this video.
A collection of best practices for UX deliverables can be seen in the image below.
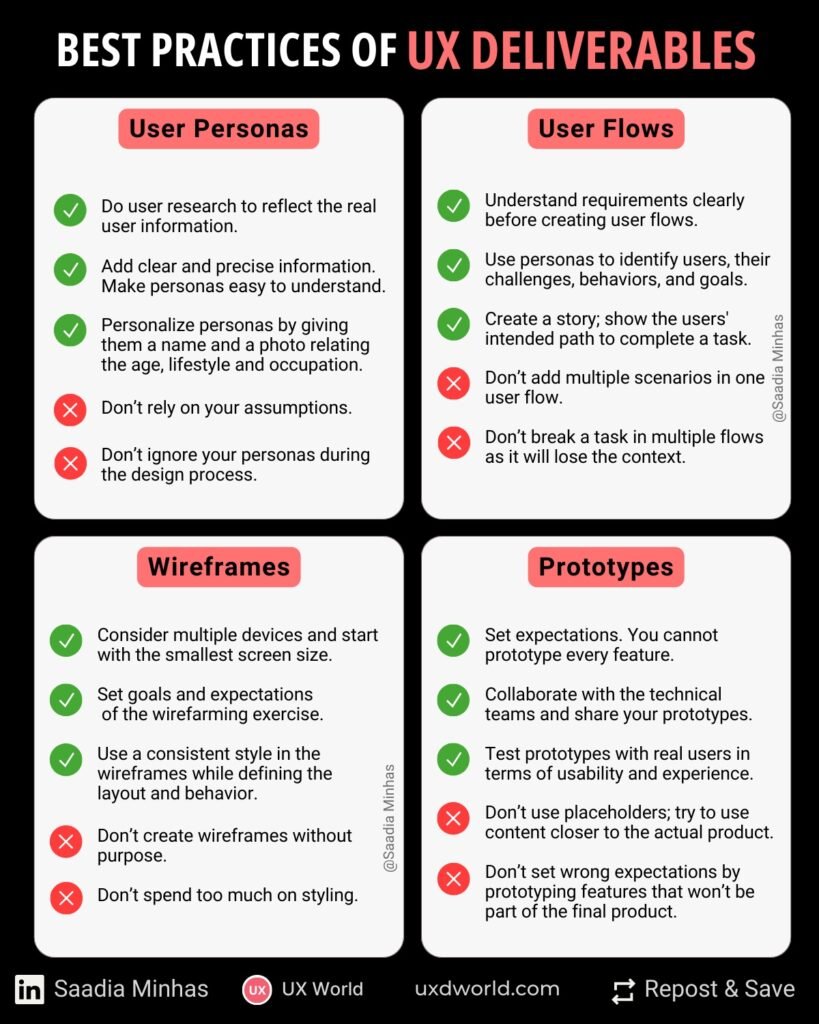
3. Wireframes
What are wireframes?
Wireframing is a way to define the basic structure and layout of your product. Using simple greyscale lines and boxes, you define the screens, layout, navigation, and functionality of the product. Wireframes define the building blocks of the product in a simple and quick way.
Importance of wireframes in design process?
The purpose of wireframes is to provide a visual understanding of the product early in the design process to your stakeholders and clients. Sharing the wireframe with the stakeholders and getting their feedback helps to improve the design ideas.
Since wireframing is a quick and cheaper way to create the design, it is easier to present multiple design ideas and update them on the spot to facilitate client discussions. If you skip wireframes in the design process, it will become costly to make changes at the later stages of the design.

Do’s and Don’ts of wireframes
Do’s
1. Start from lo-fi
Always start with the creation of low-fidelity wireframes. A wireframe is a greyscale skeleton of the required layout and UI screens with no colors and styling. Define the user interactions on each screen.
2. Consider multiple devices
Depending on the needs of your users, design wireframes for the required devices. Use the relevant screen size according to the device you are targeting. One tip is to start your work with the smallest screen size for each device type.
3. Set goals and expectations
Discuss with your clients and decide the real purpose of wireframes for them. A few questions are good to clarify before starting your wireframes. For example, how much detail they want to see in wireframes, how close the wireframes should be to the real design, and what features they want to see in wireframes, etc.
4. Keep wireframes simple
Keep your wireframes simple so that they are easy to redesign and share with stakeholders. Use separate wireframes to present different options. Don’t make complex wireframes that are difficult to understand and take a long time to update. Use neutral colors like black, white, and grey and standard fonts like serif and sans-serif.
5. Be consistent
Although wireframes are a draft version of your design and are subject to change, however, they are the foundation of your design. It is very important to follow a consistent style throughout the wireframes while defining the layout and behavior. It will give a professional look to the wireframes and make them appealing to your clients.
6. Use real content
To save time you may want to use placeholder text like Lorem Ipsum to show the text in your design. You may also want to use small boxes in place of icons. However, using this type of content will not give a real look to your wireframes. And when the design is created with actual content, the entire look of the layout will change. It is always a better idea to use real or close to real content in your wireframes.
7. Show a variety of ideas
It is a common practice that when you are in the design phase, always try to share multiple ideas for a single feature or user flow. Presenting as many ideas as possible will open new ways of thinking and discussions. It helps to reach the best possible design option. Wireframes provide a simple and easy way to create and present multiple design ideas to your client.
8. Use annotations
Annotations provide a good way to place comments and guidelines on wireframes when presenting your ideas to the client. Make sure to keep the annotations short and to the point. Use arrows to show the direction of the flow. Annotations should look different from the UI controls being used in wireframes.
9. Share and get feedback
Build wireframes and use them to collaborate and get user feedback. You can use available tools to design your wireframes and share them online with stakeholders to get their feedback. Improve your design options based on this feedback.
Get 3 months of free membership to learn UX Design here!
Don’ts
1. Don’t create wireframes without purpose
Do not start creating wireframes before you know the goal, purpose, target user types, and the problem that you are going to solve using wireframes.
2. Don’t spend too much on styling
Wireframes are used to communicate your ideas about the intended design. They show the desired layout, content, and flow. There is no need to spend much time and cost in the styling of wireframes. The best way is to select a tool and stick to its features to create wireframes. Spending time and effort to create beautiful wireframes will make it difficult and costly to update them. At later design stages, you can focus on visual design.
3. Don’t be afraid to iterate
Since wireframes are created to present ideas to stakeholders, get their feedback, and update them, so don’t be afraid to iterate them again and again. You indeed put a lot of effort into designing each version of the wireframes, but keep in mind that you are moving towards a better version each time with a lot of learning experience.
4. Don’t start with digital tools
It is tempting to open a tool and start designing the screens. However, sketching on paper or whiteboard at the early design stages will make it easier to brainstorm your ideas in a better way.
5. Don’t use colors
Colors are a good way to distract the attention of the audience, and the purpose of wireframes is to focus on the layout, functionality, and flow. It is better to use white and grey colors in your wireframes. This will not distract the attention of your clients and will also save your time.
6. Don’t use graphics and images
If you want to display images and videos in your wireframes, use boxes to show the placeholders. Using heavy images will lose the purpose of wireframes.
4. Prototypes
What is a prototype?
Prototyping is an iterative way of creating an interactive draft version of the product which is used to validate your design ideas without writing a single line of code. Prototypes can be low-fidelity with a less refined look, or high-fidelity describing the details of the final product. Prototyping makes it easier to communicate your design to your stakeholders, get their feedback, and refine prototypes before creating the final product.
Importance of prototypes in design process
Getting early feedback and making updates in a prototype is more convenient and less costly as compared to making changes in the final product.
A prototype cannot cover all aspects of your product, but it helps you finalize the layout and user flow. A big advantage of prototyping is that if it is right, you will earn the project, and if it is wrong then you will learn about things that need to be avoided in the future.

Do’s and Don’ts of prototypes
Do’s
1. Set expectations
Prototyping is a time-consuming activity and you cannot prototype every feature of your upcoming product for your client. To avoid any misunderstanding, be clear with your client that the prototype will not represent the finished product.
2. Collaborate
Real-time collaboration helps you to make small changes quickly and easily with less effort and time. Many prototyping tools allow you to share your prototypes by a link and your stakeholders can go through the link and enter their feedback and collaborate with you remotely. “This highly iterative process allows a design to be quickly reviewed, commented on, or validated, by team members or by a client throughout the prototyping phase.”
3. Involve technical team
It is a good idea to involve your technical team in the design process and share your prototypes with them to get feedback from the technical perspective. They will tell you the limitations they can face while developing the prototype, and how much time it will take to develop different design ideas.
4. Test prototypes with real users
Test your prototypes with real users and get their feedback in terms of usability, experience, and functionality. Use the testing results to improve and finalize your design.
5. Create high-fidelity prototypes
To make your prototypes look closer to the real product, use content, images, and graphics like the actual design. This will help to set the expectations of your client for the final product.
6. Create templates
Prototyping is an exercise that takes your time and effort. Try to create templates that can be used in your future products. This will help you to define a consistent layout of your product and save your time.
Get 3 months of free membership to learn UX Design here!
Don’ts
1. Don’t prototype everything
It is not feasible to prototype all the features of your product. It will take a lot of effort and time, and the result will be a complex prototype. Updating this type of prototype based on user feedback is costly. Only prototype the features that you want to show and test with your users.
2. Don’t use placeholders
Do not use placeholder text and image boxes in your prototypes. Using Lorem ipsum text, the prototype will not show a realistic view of your product. Always try to use content that is closer to the actual product. Only then your client will be able to provide useful feedback for improvement.
3. Don’t be a perfectionist
A prototype doesn’t need to be perfect. If you are paying close attention to every detail of the prototype, it will be fatigue for you and you will get tired very early. Since this is a prototype, there will be a few gaps in it.
4. Don’t make everything functional
Adding interactions in a prototype to link multiple screens cannot be done for every action item. You will have to select a few interaction points on each screen where the users can click and move to the next screen. Don’t forget that you are not designing a fully functional product.
5. Don’t prototype features that won’t be in the final product
Doing so will create wrong expectations. Try to present only those ideas that you are capable of implementing in the given time and budget. If you are presenting anything that is out of the scope, then you can take it as a new product or an enhancement in the existing contract with your client.
Conclusion
As a UX designer, you work and produce several deliverables throughout the design process. Few of them are delivered to stakeholders or clients, and few are for your use while doing the design thinking. The listed best practices will help you to enhance your design skills in each phase of the process. Create each deliverable as an effective communication tool to sell your ideas to your clients.
This article was originally published at Marvel.
Thanks for reading. Find more related articles at uxdworld.com. If you have any questions, contact here: Linkedin | Twitter | Facebook